Let’s Encrypt mozilla, cisco başta olmak üzere bir çok teknoloji devinin desteklediği ücretsiz SSL sertifikası sağlayıcısıdır. Google başta olmak üzere sektör devleri internet üzerindeki tüm trafiğin şifreli ve böylece güvenli olmasını artık standart olarak talep etmeye başladı. Let’s Encrypt’den önce SSL sertifikası almak oldukça zor ve neredeyse sadece kurumsala hitap eden ücretli bir süreç iken artık bir kaç satır kod ile herkes sitesini daha güvenli ve günümüz koşullarına uygun hale getirebiliyor.
Bu yazımızda bir test adresi üzerine certbot kullanarak letsencrypt kuracağız. certbot ücretsiz ssl sertifikamızı almak için kullanacağımız EFF tarafından geliştirilen komut satırı uygulamasıdır. Bu sayede elle sertifika dosyası kopyalama ve sunucu yapılandırma işlemlerini yapmamıza gerek kalmayacak
Öncelikle web sunucu olarak nginx kullanacağımız için gerekli yapılandırma dosyalarımızı /etc/nginx/sites-enabled dizininde oluşturalım:
nano /etc/nginx/sites-enabled/test.kodto.com
server {
  listen 80;
  root /var/www/test.kodto.com;
  index index.php index.html;
  server_name test.kodto.com;

  location / {
    try_files $uri $uri/ =404;
  }
}
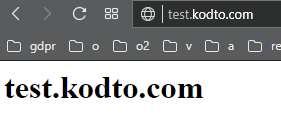
Ardından mkdir /var/www/test.kodto.com ile yayın yapacağmız dizini oluşturalım ve içerisine test maksatlı herhangi bir index.html dosyası ekleyelim. Bunun için komutunu kullanabiliriz. Yapılandırma dosyamızı da hazırladıktan sonra nginx -t ile kontrol edip service nginx restart ile sunucumuzu yeniden başlatarak yeni domainimizi dışarıdan gelecek isteklere açalım. Ardından test adresimize eriştiğimizde http üzerinden yayında olduğunu görebilmemiz gerekiyor.  Şu aşamadan sonra Let’s Encrypt kurulumuna geçebiliriz. Öncelikle: sudo add-apt-repository ppa:certbot/certbot komutu ile certbot için gerekli olan eff paket deposunu sunucumuza ekliyoruz. Ardından: sudo apt-get update && sudo apt-get install python-certbot-nginx -y komutu ile certbot kurulumunu yapıyoruz. Artık ssl sertifikamızı alabileceğimiz certbot aracı sisteminize kurulmuş durumda. Alttaki tek satırlık komutla ssl sertifikamızın temin edilip nginx sunucumuza kurulmasını sağlayabiliriz: sudo certbot –nginx -d test.kodto.com Eğer birden fazla domain, subdomain için sertifika oluşturacaksak -d parametresiyle bunları da vermemiz gerekiyor, örneğin: sudo certbot –nginx -d wptests2.fikir.pw Ardından kurulum işlemini sorulan sorulara yanıt vererek tamamlıyoruz. Önemli noktalardan biri otomatik kurulum için sorulan soruya evet yanıtı vermek:
Saving debug log to /var/log/letsencrypt/letsencrypt.log
Plugins selected: Authenticator nginx, Installer nginx
Obtaining a new certificate
Performing the following challenges:
http-01 challenge for test.kodto.com
Waiting for verification...
Cleaning up challenges
Deploying Certificate to VirtualHost /etc/nginx/sites-enabled/test.kodto.com

Please choose whether or not to redirect HTTP traffic to HTTPS, removing HTTP access.
- - - - - - - - - - - - - - - - - - - - - - - - - - - - - - - - - - - - - - - -
1: No redirect - Make no further changes to the webserver configuration.
2: Redirect - Make all requests redirect to secure HTTPS access. Choose this for
new sites, or if you're confident your site works on HTTPS. You can undo this
change by editing your web server's configuration.
- - - - - - - - - - - - - - - - - - - - - - - - - - - - - - - - - - - - - - - -
Select the appropriate number [1-2] then [enter] (press 'c' to cancel):
Bu aşamada http isteklerini https ye yönlendirmek istersek 2 numaralı seçeneği tercih etmemiz gerekiyor. Kopya içerik gibi sorunlarla uğraşmamak adına bunu tercih etmek daha mantıklı olacaktır. Ardından kurulumun tamamlandığına dair mesaj karşımıza çıkıyor:
- - - - - - - - - - - - - - - - - - - - - - - - - - - - - - - - - - - - - - - -
Congratulations! You have successfully enabled https://test.kodto.com

You should test your configuration at:
https://www.ssllabs.com/ssltest/analyze.html?d=test.kodto.com
- - - - - - - - - - - - - - - - - - - - - - - - - - - - - - - - - - - - - - - -

IMPORTANT NOTES:
- Congratulations! Your certificate and chain have been saved at:
/etc/letsencrypt/live/test.kodto.com/fullchain.pem
Your key file has been saved at:
/etc/letsencrypt/live/test.kodto.com/privkey.pem
Your cert will expire on 2018-11-15. To obtain a new or tweaked
version of this certificate in the future, simply run certbot again
with the "certonly" option. To non-interactively renew *all* of
your certificates, run "certbot renew"
- If you like Certbot, please consider supporting our work by:

Donating to ISRG / Let's Encrypt: https://letsencrypt.org/donate
Donating to EFF: https://eff.org/donate-le
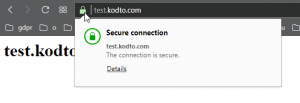
Certbot bizim için ücretsiz ssl sertifikasını aldı ve nginx sunumuza kurdu ve nginx i yeniden başlatarak trafiğimizi https protokolüne uygun hale getirdi. Test adresimize tekrar baktığımızda ssl ikonunu göreceğiz:
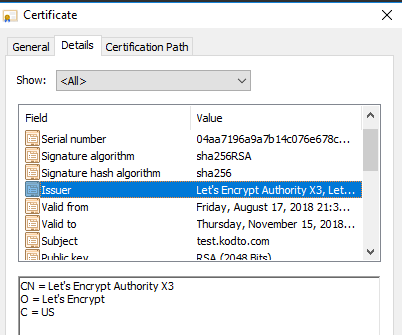
Detaylara baktığımızda sağlayıcının Let’s Encrypt olduğunu görüyoruz:
Sertifikalarımızı yenilemek için certbot renew komutunu çalıştırabiliriz. Bunun için crontab -e ile aşağıdaki gibi bir cron tanımlamak yararlı olacaktır.
crontab -e ile cronjob ayar dosyamıza giriyoruz ve sonuna aşağıdaki görevi ekliyoruz:
0 0 * * * certbot renew --post-hook "service nginx restart"
Bu şekilde her gün gece yarısı süresi azalmış sertifikalarımız yenilenecek ve web sunucumuz bunların aktif olması için yeniden başlatılacaktır. Daha detaylı işlemler için ise certbot certonly komutunu kullanabiliriz.
Kaynaklar:

